Difference between revisions of "The Players' Guide to the Cities/Getting Started"
From Paragon Wiki Archive
m (testing to see if this is still broken...(will need to commit change and logout to see for certain)) |
(Updated "Updated" Banner) |
||
| (5 intermediate revisions by 3 users not shown) | |||
| Line 1: | Line 1: | ||
| + | {{PlayerGuide Currency|issue=21|date=17 October 2011}} | ||
== Overview == | == Overview == | ||
| − | + | [[File:Gameinfo_gettingstarted.jpg|left|350px]] | |
| − | [[File:CoH_Updater.jpg|thumb | + | {{clrl}} |
| − | + | [[File:CoH_Updater.jpg|thumb|150px|City of Heroes Updater]] | |
To enter City of Heroes or City of Villains, complete the following steps: | To enter City of Heroes or City of Villains, complete the following steps: | ||
| − | + | * [[Game Client#Installing the Game|Install]] the game to your hard drive. | |
| − | + | * Double-click on the shortcut on your desktop or use the Windows Start menu to [[Game Client#Launching the Game|launch]] the updater. | |
| − | + | * Each time you launch the game it will bring up the updater to check for and (if there are any) automatically load any updates posted by the design team. Follow the on-screen prompts to proceed to load the game. | |
| − | + | ||
| − | + | ||
| − | + | ||
| − | + | ||
| − | + | ||
| − | + | ||
{{clr}} | {{clr}} | ||
{{Gametip|game=both|tip=If new updates for the game are available, they will automatically be applied when you launch the updater.}} | {{Gametip|game=both|tip=If new updates for the game are available, they will automatically be applied when you launch the updater.}} | ||
| − | [[File:UI_Login.jpg|thumb | + | [[File:UI_Login.jpg|thumb|150px|Log-in Screen]] |
| − | [ | + | * On the main log-in screen, enter the account name and account password for your [http://us.ncsoft.com/ NCsoft] account. |
| − | |||
| − | |||
| − | |||
| − | |||
| − | |||
| − | |||
| − | |||
| − | |||
| − | |||
| − | |||
| − | |||
| − | |||
{{clr}} | {{clr}} | ||
| − | {{Gametip|game=both|tip=Characters are created for a specific server and may only be played on that server. If you choose to play on a new server, you will have to create new characters to play on that server. Optionally, you may transfer your character to another server by purchasing a Server Transfer.}} | + | [[File:UI_Server_Select.jpg|thumb|150px|Server Selection Screen]] |
| − | {{Gametip|game=both|tip= | + | * Select the [[Servers|server]] on which you wish to play. When selecting a server, check the colored bubbles next to the server name. The more bubbles, the higher the system load that the server is currently experiencing. If a server has too high a system load, you won’t be able to choose it. |
| + | * When you select your server, you may choose a character you’ve already created and begin play, or you may choose to [[The Players' Guide to the Cities/Creating a Character|create a new character]]. You may create several characters on any given server. You may also delete a previously created character to free up a [[Character Slot|character slot]]. Note that once a character is deleted, he or she is irretrievably gone. | ||
| + | * If selecting an existing character, click on "Enter Paragon City" or "Enter the Rogue Isles" to proceed. | ||
| + | {{clr}} | ||
| + | {{Gametip|game=both|tip=Characters are created for a specific server and may only be played on that server. If you choose to play on a new server, you will have to create new characters to play on that server. Optionally, you may transfer your character to another server by purchasing a [[Server Transfer]].}} | ||
| + | {{Gametip|game=both|tip=VIPs are given 12 character slots per server when they create their account. Optionally, you may earn and/or purchase purchase up to 24 extra character slots per server for a total of 36 per server. Free and Premium players start with 2 Unlock tokens which they may use to claim character slots on any server and may purchase more from the [[Paragon Market]].}} | ||
[[Category:The Players' Guide to the Cities|Getting Started]] | [[Category:The Players' Guide to the Cities|Getting Started]] | ||
Latest revision as of 08:41, 17 October 2011
Overview
To enter City of Heroes or City of Villains, complete the following steps:
- Install the game to your hard drive.
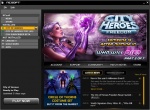
- Double-click on the shortcut on your desktop or use the Windows Start menu to launch the updater.
- Each time you launch the game it will bring up the updater to check for and (if there are any) automatically load any updates posted by the design team. Follow the on-screen prompts to proceed to load the game.
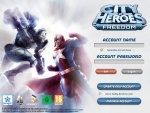
- On the main log-in screen, enter the account name and account password for your NCsoft account.
- Select the server on which you wish to play. When selecting a server, check the colored bubbles next to the server name. The more bubbles, the higher the system load that the server is currently experiencing. If a server has too high a system load, you won’t be able to choose it.
- When you select your server, you may choose a character you’ve already created and begin play, or you may choose to create a new character. You may create several characters on any given server. You may also delete a previously created character to free up a character slot. Note that once a character is deleted, he or she is irretrievably gone.
- If selecting an existing character, click on "Enter Paragon City" or "Enter the Rogue Isles" to proceed.


